DIY, Crafts & Other Projects

Just another WordPress.com site

Homemade Sugar Cubes

I have these on my other blog, and thought they would be good here too. 🙂

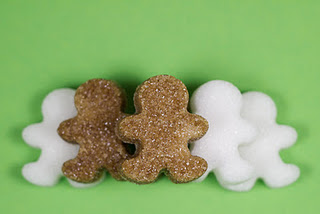
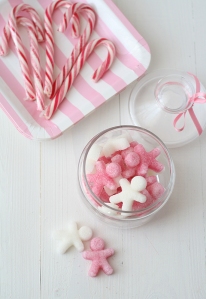
Cute idea found here. I added some other photos I found on the internet for ideas.

Homemade Sugar Cubes

Summary: How to make homemade sugar cubes

Preparation time: 5 min
Cooking time: 5 min (in total)

Yield: 24 aprox, depending on the size of the mold you use

Ingredients

  • 1 cup sugar
  • 1 tablespoon water (to make the rose sugar cubes, I used water infused with berry tea instead of plain water)
  • Any mold suitable for microwave. I used this one from Silikomart

Directions

  1. Put sugar and water into a bowl and stir with the spoon until the sugar is thoroughly and consistently moistened
  2. Put the sugar mixture into your mold. Press down the sugar in each hole with the spoon (or with your fingers) to ensure both that the sugar is firmly packed in and that there are no large air holes
  3. Microwave for 30 to 40 seg
  4. Let cool on the mold for a few minutes, and unmold carefully
  5. Keep on an airtight container

January 21, 2012 Posted by | DIY, easy, Food, Gifts, Valentines | Leave a comment

Valentine’s Gift – I Dig You!

These are really cute. For the complete post see it here. There are a couple of other cute ideas.


– I bought the shovels on ebay. I searched plastic shovels and bought an auction that sold them in a lot of 36. The shovels were about 3 inches wide and 7 inches tall.
– I did make a blank page with “I Dig U!” circles. I used a 2 inch scalloped punch.
-Someone told me she just bought the same shovels for $0.40/ each at Giant Party Store online. Here’s a link to the shovels. http://www.giantpartystore.com/Sand-Shovels-Plastic/Catalog.cfm/iProdID/85537 

January 20, 2012 Posted by | Gifts, Party, Valentines | Leave a comment

Recycled Plastic Spoons Hanging Lamp

Here is another project found on a foreign sites. I couldn’t read anything, so I just saved the photo. Just looked interesting & cheap. I could see it done with different colors of spoons. My son might like it for a rainy day project.

January 18, 2012 Posted by | Crafts, Decoration, DIY, Upcycle | Leave a comment

Tissue Rosette Kissing Balls

Good morning! I found these Tissue Rosette Kissing Balls over @ The Idea Room. When you get a chance check out their blog. Lots of great ideas there.          

 Tissue Rosette Kissing Balls

First off you will need a couple of rolls of tissue paper streamers. You can find them many places in many colors. Mine were $1 each.

Start by cutting the paper into strips about 24 inches long. Then crumple them up to make them softer {this part is optional, depends on what look you like–experiment}. Then fold the top 1/3 of it down so it is not as wide. {again…optional}
Photobucket
Now take your strip and start on one end and begin rolling it up between your fingers.
Photobucket
After you have a few rolls, continue to roll it up but now twist the paper.
Photobucket
Now just continue to roll and twist until you have reached the end of the strip. I liked to add a drop of hot glue to the end so they did not unravel.
Photobucket
After you have a few rosettes made, start glueing {I used a glue gun} them onto a round Styrofoam ball. I used 2 and 3 inch ones to make them in different sizes. Just glue them close together and fit them in where they sit together nicely.
Photobucket
On this particular rosette ball, I did not twist the paper. I did some both ways and like that they come out a bit different. Below is a picture of one that I rolled AND twisted the strip of paper. Does that make sense? Can you see a difference?
Photobucket
The fun thing is to just try different things. You will eventually find something that works for you and your taste preferences.
Photobucket
Pretty easy right? These are the perfect thing to do when you are snowed in and watching your favorite TV program or chic flick!
Enjoy 🙂

January 18, 2012 Posted by | Crafts, Decoration, DIY, easy, floral decor, Flower, flowers, Tissue Paper, Topiaries, Valentines | Leave a comment

Dollar Store Heart Garland

Found Here

I grabbed some of these heart picks from the Dollar Tree, not knowing exactly what I’d do with them. After holding on to them for about a week, I decided to make a Valentine’s Day garland with them. It seriously took like 10 minutes! My kind of project!


I just pulled the styrofoam hearts off the picks.

Most of them came off super easy, I had one or two put up a fight. Then I just used a needle and some crochet thread and strung them up, and adjusted the hearts so they were spaced evenly! The thread was thick enough to hold them in place. Super easy, and you can make it as long or as short as you want. The best part is this only cost me $2!


January 16, 2012 Posted by | Crafts, Decoration, DIY, easy, Hearts, Valentines | 1 Comment

Photo Pendants Tutorial

 I thought you all might appreciate a break from all the heart/ Valentines projects, I’ve been posting lol…I thought about saving for mothers day, but just couldn’t keep this to myself.

I found this post on Ginger Snap Crafts Here. Check out there blog when you get a chance 🙂

Tutorial {photo pendants}

These personalized photo pendants are so easy & fun to make!
I first saw these over on
Sugar Bee Crafts & knew I had to make some!

I got everything I needed to make these from the esty shop, Candy Tiles.

You can buy bundle kits that includes all of your supplies to make these!

You’ll need:
glass tiles
bails
Diamond Glaze
Super Glue
chains
You’ll also need a black & white photo printed out on white cardstock.
I just used Microsoft Word to size my photos & print them out.
Mine are .8 inch by .8 inch.
Put a tiny drop (about a pea size amount) of the Diamond Glaze on your tile.
Then use a small paint brush to spread it out a little.
You don’t want it oozy…so if you have too much just brush some off.
While the Diamond Glaze is still wet, set your picture face down on your tile.
Rub the back of your paper to get a really good seal.
Let it dry for 5-10 minutes. Then squirt some Diamond Glaze on the back of the photo.
Spread it out with a brush to seal your paper. Let it dry for several hours.
After they are dried, use super glue to attach the bail to the back.
Be careful on this part! I seriously glued my fingers together! grrrr! 😦
There you go! All done! So easy!
These would make great Valentine gifts! Just sayin’! 😉

January 13, 2012 Posted by | Braclet, Crafts, DIY, easy, Gifts, Jewelry, My Favorites, Photos, Wear It | Leave a comment

Make Heart Hangings For Your Home « found on woollywotnots

Here’s how to make great heart decorations for your home. You can make them in a variety of colors to match your home decor or make them stripey and multicolored. They are great to make with friends and children. They are very simple and look great. You can use them for Valentine’s, special occasions or have them hanging around your home all year round.
Use scrap cardboard. You could recycle your cereal boxes and use up any oddments of wool. You’ll also need a pencil or pen to draw out your template and some scissors.

Sketch out a heart to whatever size you prefer and draw out a second heart inside it, leaving about an inch and a half between the two hearts.

Cut around the outer edge of your heart and cut out the middle heart, so that you have a template like this:

Wrap the wool around the heart. Continue wrapping the wool around until you can’t see any cardboard.


Finally, use some of the wool to make a hanging loop and hang your hearts on door handles, walls or from ceilings. Make them in a variety of sizes and colors.
The finished hearts look like this:


The blog where this was found is here 🙂

January 13, 2012 Posted by | Crafts, Decoration, DIY, easy, Hearts, Valentines, Wreath | Leave a comment

Salt Dough Beads | Found on Tumblr

Salt dough – 2 cups flour, 1 cup salt, cold water. Mix until has consistency of play dough. bake at 250 for 2 hours, then cool and paint any color….good recipe for thumbprint pendants.


January 12, 2012 Posted by | Beads, Crafts, DIY, Jewelry | 5 Comments

Felt Heart Valentines Garland

I found this here on a foreign site. Can’t read the name. This time there was no instructions to interpret. Luckily the photos are good instructions. Looks super easy…

January 11, 2012 Posted by | Decoration, easy, Felt, Garland, Hearts, quick, Red, Valentines | 1 Comment

XOXO Valentine Project Tutorial

 I love this project I found while surfing the blogs. For the complete & original post scroll to the bottom of this post – Enjoy 🙂

Here’s a cute little craft to bring a little Valentine happiness to your home! (I repurposed my Dollar Tree frames from my “Fall” grouping, except for one frame that I scrounged up here).

And the great thing is that you can take out the Valentine XOXO and store them, and then use the Dollar Tree frames again for a different project.
I also used a large black frame that I had and made a large heart for my mantle.
I was going to decoupage the frame, but discovered that I only have the shiny Mod Podge, so I will do that later.
I love that it is a very inexpensive project. I used frames I already had, plus one bag of floral marbles ($1.50), scrapbbook paper I already had and E6000.
This is what I did:

Took the pictures out of my Dollar Tree frames and traced the outline on my scrapbook paper. Found a cup that was the right size for the O’s and traced around it on two of the papers. Found the center on the other two papers and used a ruler to make an X.

Then I put a followed the outline on the X’s and O’s with a line of E6000 craft glue. I then put a line of marbles on the glue. Then I made another line on each of the X’s and O’s and put another line of marbles. And let them sit overnight to dry.
For the large heart, I cut out the scrapbook paper to fit inside the heart. Then I cut out another sheet of paper the same size using leftover paper (you will not keep this part so you could use plain copy paper). I folded that extra paper in half and then cut out a heart that was a little smaller than the paper. Then I traced that heart on the paper that goes inside the frame — using pencil. After that I put a bunch of the E6000 inside the heart outline and then filled it in with marbles. And I let it sit overnight to dry.
The next day I put the paper inside of the frames. The glass that comes with the frames I put behind the paper with the marbles on it. This way I won’t lose the glass if I want to use it again with the frame for another project.
I like the size of the glass marbles and the way they sparkle in the sun!


Found Here:
XOXO Valentine Project Tutorial

January 11, 2012 Posted by | Crafts, Decoration, DIY, easy, My Favorites, Valentines | 2 Comments